
Welcome to our article on how to grow and care for spider plants. Spider plants, scientifically known as Chlorophytum comosum are popular indoor plants known for their air-purifying qualities and graceful foliage. In this article, we’ll explore tips and techniques to help you cultivate and maintain spider plants in your home.
Table of Contents
Spider Plant

For good reason, plant lovers all around the world adore spider plant (Chlorophytum comosum), despite their creepy and weird name. These lovely indoor plants have a distinct charm that combines low maintenance requirements with eye-catching aesthetic appeal.
Spider plants are native to South Africa’s coastal regions. They are distinguished by their thin, grass-like leaves that arch beautifully outward from a central point. Their leaves, which can grow to be 12 to 18 inches long, are variegated in patterns of white and green or vivid green. The leaves are particularly noteworthy for having a unique channel or fold down the middle, which adds to their oddball attractiveness.
The ability of spider plants to multiply is one of its primary attractions. Spider plants develop into clusters of tiny offshoots called spiderettes as they get older. Spider plants are a great option for both inexperienced and experienced gardeners because they are easily propagated from seed to add new elements to your indoor space.
Spider plants are prized for being low-maintenance in addition to their aesthetic appeal. Since their rhizomes and thick, fleshy roots have evolved to store water, they can tolerate irregular watering schedules or periods of neglect. Because of their versatility, spider plants are a great option for people with hectic schedules or beginners in gardening.
Spider plants bring a whimsical touch and a splash of greenery to any interior setting, whether they are perched on a sunny ledge or dangle elegantly from a bamboo hanger.
| Botanical Name: | Chlorophytum comosum |
| Common Name: | Spider plant, Spider Ivy, Ribbon Plant, Mother-in-law’s Tongue Plant |
| Plant type: | Herbaceous, Perennial |
| Family: | Asparagacae |
| Size: | 1-2 feet tall and wide |
| Light: | Bright, indirect light |
| Soil Type: | Loamy, Well-drained |
| Soil pH: | Neutral to slight acidic |
| Flower Colour: | White |
| Native Area: | Central and Southern Africa |
| Benefits: | Air-purifying, Low maintenance, Non-toxic to pets |
Benefits of Spider Plant

Spider plants, or Chlorophytum comosum, are a favourite among the plant lovers since they are not only aesthetically pleasing but also provide a number of advantages. This is why getting a spider plant for your collection should be really beneficial:
Perfect for any decor: Spider plants add a touch of elegance and fascination to any interior space with their gracefully arching leaves and eye-catching variegation. Whether your aesthetic is minimalist, vintage, or modern, these vivid green beauties infuse your house, workplace, or any area in between with a revitalizing vibe.
Great for Beginners: Spider plants make a great first plant if you’re not experienced with plant care. They are perfect for inexperienced growers who want to practice their green thumb as they can withstand a wide range of environments and are forgiving of the odd neglect.
Offsets, or Babies, for New Plants: One of the most satisfying parts of having a spider plant is that it can produce offsets, or tiny plants, which are referred to as “spiderettes.” You may share the joy of gardening with friends and family or add to your collection of spider plants by simply propagating these little offshoots.
Safe Alternative Around Pets: Spider plants are non-toxic and safe to have around cats, dogs, and other furry pals, in contrast to certain houseplants that might be poisonous to pets. They are therefore a well-liked option for pet owners who wish to foster a green environment without having to worry about their animal companion’s safety.
Natural Air Purifier: Spider plants are well known for having the ability to filter the air. By successfully eliminating dangerous pollutants from the air, such as formaldehyde and xylene, they enhance indoor air quality and produce a better atmosphere for you and your family to breathe. According to a NASA study from 1989, indoor air might be purified and volatile organic chemicals could be eliminated by plants. Among the plants used in this investigation was the spider plant.
Health Benefits: In addition to its aesthetic value and capacity to filter the air, spider plants have other health advantages. Spider plants are a great addition to any home or workplace area, since studies have shown that spending time among indoor plants may reduce stress, raise mood, and enhance general well-being.
Types of Spider Plant
Bonnie: Bonnie lends a touch of elegance to any area with her curled green leaves accented by a dramatic white middle stripe. Its exquisite white blossoms provide even more allure.
Variegatum: This plant has tall, green stems and cream or white leaves with a noticeable green stripe. It has an eye-catching color combination.
Vittatum: This plant is distinguished by its tall stems that gracefully arch outward, giving it an air of grace. Its green leaves are accentuated by a noticeable white stripe in the middle.
Solid Green: This less popular cultivar has unvarnished, solid green leaves. Despite having a straightforward appearance, its dense foliage gives inside rooms a revitalizing green feel.
How to Care for Spider Plant?

Light:
Spider plants can withstand lower light levels but do best in bright, indirect light. They should not be placed in direct sunlight as this could scorch their fragile leaves. The best place is in a well-lit room away from direct sunshine, or next to a window with sheer curtains.
Soil:
For your spider plant, choose a potting mix that drains well. To ensure sufficient drainage and aeration for strong root growth, a blend of peat moss, perlite, and vermiculite is a good option.
Water:
Maintain a uniformly damp but not saturated soil. When the top inch of soil appears dry to the touch, water your spider plant. It’s critical to let extra water escape the container since overwatering might cause root rot.
Temperature and Humidity:
The ideal temperature range for spider plants is between 60°F and 75°F (15°C and 24°C). During the winter, they can withstand slightly lower temperatures, but drafts should be avoided. Although they do well with ordinary indoor humidity levels, spider plants will benefit from the odd soaking, particularly in the arid winter months.
Winter and Summer Care:
Since the plant’s growth slows down in the winter, water it less frequently and don’t fertilize. To stimulate active development, increase watering during the summer and fertilize every two to four weeks with a balanced liquid fertilizer diluted to half strength.
Fertilizer:
During the growing season (spring and summer), give your spider plant a balanced liquid fertilizer designed for houseplants. Use fertilizer as directed by the manufacturer, diluting and applying it every two to four weeks.
How to Grow Spider Plant Babies?
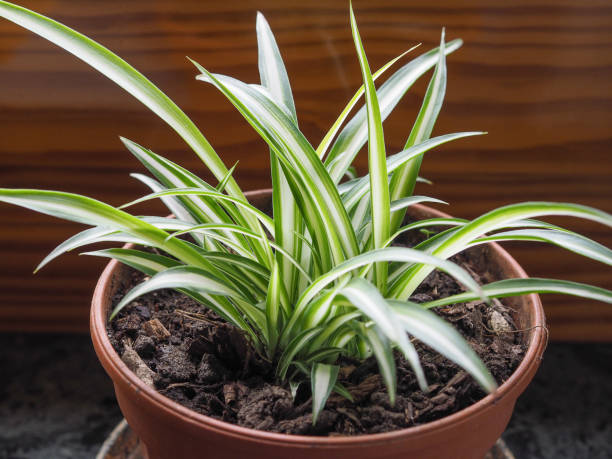
Spider plants are well recognized for their profusion of tiny plantlets, called pups or spiderettes, that hang gracefully from the parent plant. For any lover of plants, growing these kids is not only simple but also enjoyable. Here’s how to raise and propagate offspring of spider plants:
- Identifying Baby Spider Plants:
On the arching stems of the parent plant, look for little offshoots. These pups are ready to be multiplied and have little roots. - Preparing for Separation:
Gently pull the babies to make sure they have formed roots. They are prepared to be taken away from the parent whenever they start to rebel. - Dividing the Offshoots:
Gently cut or twist the stem that connects the offspring to the parent plant. - Selecting the Correct Pots:
To avoid waterlogging and root rot, choose tiny pots with drainage holes and well-draining soil. - Planting the Babies:
Maintain each baby’s root level in the soil by burying it at the same depth as the parent plant. - Taking Care of the New Arrivals:
Water the potted babies frequently to keep the soil damp but not soggy, and place them in bright, indirect sunlight. - Observing Growth:
With regular attention, the young spider plants will root themselves, begin to grow, and eventually produce offspring of their own.
How to Grow Spider Plant from Seeds?
While Spider Plants are more commonly propagated from their offshoots or “spiderettes,” you can also grow them from seeds. Growing spider plants from seeds is a bit more challenging and time-consuming but can be incredibly rewarding. Here’s how you can do it:
1. Gather Your Materials:
- Spider Plant seeds (These are typically small and dark brown in colour).
- Small pots or containers for planting.
- Seed starting mix or a well-draining potting soil.
- A spray bottle for watering.
2. Prepare the Planting Containers:
- Fill your pots or containers with a seed starting mix or well-draining potting soil. Make sure the containers have drainage holes at the bottom to prevent waterlogging.
3. Plant the Seeds:
- Moisten the soil lightly before planting to ensure it’s evenly damp but not soggy.
- Sprinkle the Spider Plant seeds evenly over the soil surface. You don’t need to bury them; simply press them gently into the soil.
4. Provide Proper Care:
- Place the pots in a warm, bright location with indirect sunlight. Avoid direct sunlight, as it can scorch the delicate seedlings.
- Keep the soil consistently moist but not waterlogged. Use a spray bottle to water gently, as pouring water directly onto the soil may displace the seeds.
- Maintain a warm temperature of around 70-75°F (21-24°C) to encourage germination. You can cover the pots with plastic wrap or a clear plastic lid to create a mini greenhouse effect and retain moisture.
- Germination usually takes about 2-4 weeks, but be patient as it can sometimes take longer.
- Once the seedlings have grown several inches tall and developed a few leaves, you can transplant them into larger pots filled with standard potting soil.
5. Provide Ongoing Care:
- Spider Plants prefer bright, indirect light and moderate watering. Allow the soil to dry slightly between waterings to prevent root rot.
- Fertilize your Spider Plants with a balanced houseplant fertilizer diluted to half strength every 2-4 weeks during the growing season (spring and summer).
- Keep an eye out for pests like spider mites or mealybugs, and address any issues promptly.
Spider Plant Pruning

Eliminate Dead or Yellowing Leaves: Begin by cutting off any leaves that are wilted, brown, or yellow. These take away from the aesthetics of your plant and also sap its vitality. To maintain the vibrancy and health of your spider plant, trim them off.
Prune Long, Grassy Stems: Does your spider plant appear a little long? Don’t worry. Take a pair of clean scissors and clip those long stems. Trim them down to a more manageable length, allowing the stem to remain a few inches above the base to encourage new growth.
Reduce Density of Overcrowded Clumps: As your spider plant ages, it could generate small spiderettes that gather at the base of the plant. It’s time to thin these clumps if they get too dense. To give the surviving baby plants room to grow and spread out, trim off a few of them.
Shape the Plant: Finally, give your spider plant a gentle shape if it is beginning to take on an untamed appearance. To keep it looking neat and appealing, trim any stray stems or leaves that are protruding unnaturally.
Spider Plant Propagation

Knowing what to anticipate is crucial before getting into propagation. Spider plants are noted for their distinctive leaf patterns, which might be lost during cutting propagation. Although variegated leaf cuttings frequently root, the newly emerging shoots, also known as pups, may not have any color. But splitting the plant guarantees that the offspring will have the same hue of leaves as their parents.
- Divide a Spider Plant: The best strategy for huge spider plants is division. After taking the plant out of the pot, gently divide the root ball into portions that have three leaves and three roots apiece. Plant these divisions in containers with drainage holes, using moist potting mix. After thoroughly watering, position in bright, indirect light.
- Root Cuttings in Water: To root cuttings, just chop off the adult leaf’s tip and put it in a jar with fresh water. In around two months, wait for roots to grow and replace the water once a week. Plant the clipping in the potting mix after it has taken root.
- Put Cuttings in Soil: As an alternative, chop a leaf into 2-inch segments horizontally, dip the lower end in rooting hormone, and plant in potting mix that has been moistened. When around two months have passed, make sure the soil is still moist and look for root growth.
How to Repot a Spider Plant?
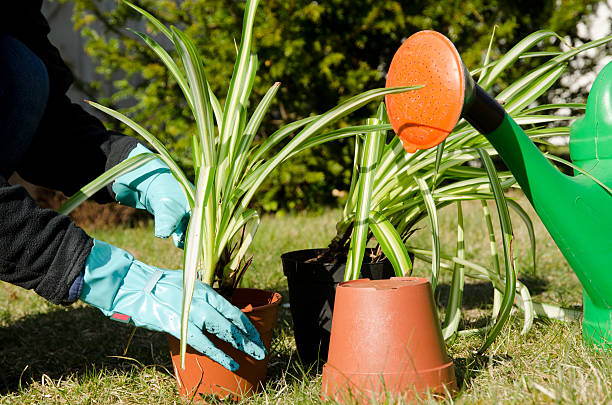
- Choose the Right Time: When your spider plant is actively developing, spring or early summer are the ideal seasons to repot it.
- Pick the Correct Pot: Choose a pot that is marginally bigger than the one you are using now. Make sure there are drainage holes in order to avoid waterlogging.
- Prepare the Soil: Use a soil mixture that drains well, like potting soil combined with sand or perlite.
- Gently remove the plant: Carefully extract the plant from its existing pot by loosening the roots.
- Examine the Roots: Look for any indications of overpopulation or root disease. Cut out any elongated or damaged roots.
- Repot the Plant: Center the spider plant in the new container, then use fresh dirt to fill up any spaces. Press down firmly on the earth surrounding the plant.
- Water Thoroughly: Give your repotted spider plant enough water to run out of the bottom of the pot.
- Position in Indirect Light: To assist your recently repotted spider plant in acclimating to its new surroundings, place it in an area with bright, indirect light.
Common Problems in a Spider Plant

- Tip Burn: When the tips of the leaves dry out and turn brown, this is known as tip burn. Numerous things, such as overfertilization, prolonged exposure to direct sunshine, or fluoride in water, might contribute to this. Keep your Spider Plant out of direct sunlight to prevent tip burn, and use distilled or filtered water to prevent fluoride buildup. Additionally, be cautious not to fertilize your plant too much.
- Mealybugs: Sometimes these annoying bugs manage to get onto your Spider Plant, sucking the sap from the leaves and leaving a sticky residue in their wake. On the leaves, you may detect small crawling insects or white cottony masses. Wipe off the infected areas with a cotton swab dipped in insecticidal soap or rubbing alcohol to get rid of mealybugs. Keep an eye out for infestations on a regular basis and separate any affected plants to stop the spread of the disease.
- Scale: The little, brownish bumps on your Spider Plant’s leaves and stems are scale insects. They can induce wilting, yellowing, and stunted growth because they feed on plant sap. Use insecticidal soap or a soft brush dipped in soapy water to gently scrub the affected areas in order to treat scale infestations. Keep an eye out for any indications of scale on your plant and respond quickly to stop additional damage.
Frequently Asked Questions
What toxins do spider plants remove?
According to the National Library of Medicine, spider plants are capable of purifying indoor air by absorbing carbon monoxide, formaldehyde, xylene, and many other hazardous gases.
How many spider plants are needed to clean the air?
According to an article by the National Wildlife Federation, it will take two or three plants in 8–10-inch pots for every 100 square feet of floor space. More toxins in the environment will require more spider plants.
How long does a spider plant lives?
Perennial plants with a good track record as houseplants generally earn that reputation because they are long-lived, and spider plant is no exception. Spider plants that are well cared for and regularly repotted and divided are often handed off from generation to generation.
Can I grow a spider plant as an outdoor garden plant?
Yes, a spider plant can make an outdoor garden plant in warm climate zones, and it is sometimes planted as an outdoor annual in colder climates. When used outdoors, it is normally planted as a garden bed edging plant or in window boxes or raised beds.
Do spider plants clean the indoor air?
Yes, spider plants have been demonstrated to remove indoor pollutants such as formaldehyde from the air. It would take a very large indoor garden to fully purify the air in an entire house, but a home with many houseplants will be a somewhat healthier one. The effect of four or five spider plants in a small office will be noticeable.
How to make spider plants bushier?
Prune the long stems occasionally to promote new growth. Trim off any leggy or overgrown parts, focusing on areas where new shoots can sprout. You can use clean scissors or pruning shears for this task. Additionally, rotating your plant periodically ensures even growth on all sides, making it appear fuller and more lush.
How often to water spider plants?
Spider plants prefer slightly moist soil but can tolerate occasional drying out between waterings. Water your spider plant thoroughly when the top inch of soil feels dry to the touch, typically every 1-2 weeks depending on environmental conditions.
Is spider plants toxic to cats and dogs?
Spider plants are non-toxic to cats and dogs, making them a safe choice for pet owners.
Where is the best place to put a spider plant?
Place your spider plant in a location where it can receive bright, indirect light, such as near a north-facing window or in a well-lit room.
Do spider plants prefer sun or shade?
Spider plants thrive in bright, indirect light but can also tolerate partial shade. Avoid placing them in direct sunlight, as this can cause their leaves to scorch and turn brown.
Why is my spider plant so sparse?
If your spider plant is sparse, it’s probably not getting the right conditions. While spider plants can tolerate low light, they do prefer bright, indirect light. Try moving your spider plant to a new spot.
0 Comments